
BIND DNS Server on a Local Network: Part 3
Getting the web server ready for BIND
disclaimer
posted: 2020-07-17 | updated: 2020-08-15
![]() page 3 of 4
page 3 of 4 ![]()

Step 4:Add local domain names to hosts files of non-mobile devices
Hey, I thought we weren’t going to use the hosts file! And you’re right. This is a temporary step for testing virtual hosts across the local network. If test sites can be accessed by their virtual host names from the web server and other non-mobile devices on the local network, then we’re on the right track and can move on to installing BIND.
-
Create a notepad shortcut for editing the hosts file
This is optional, but it saves time and frustration.
- Right click on the desktop, hover over New and click Shortcut
-
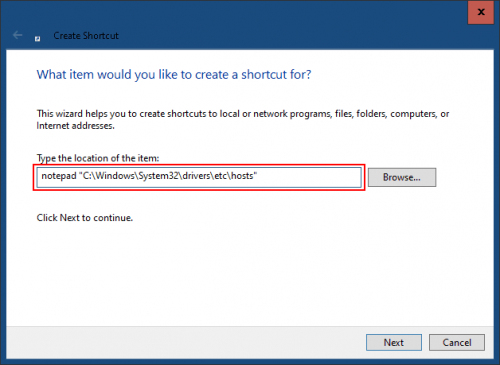
In the location text box, enter:
notepad “C:\windows\System32\drivers\etc\hosts”
Click Next
-
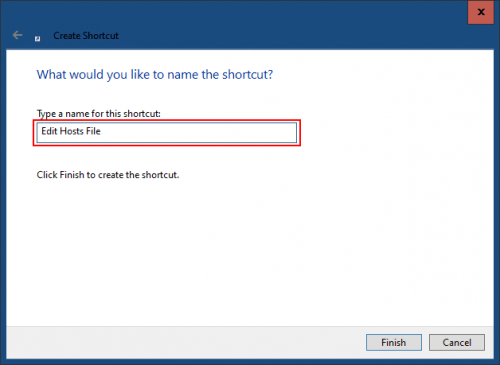
Give the shortcut a name, click Finish
-
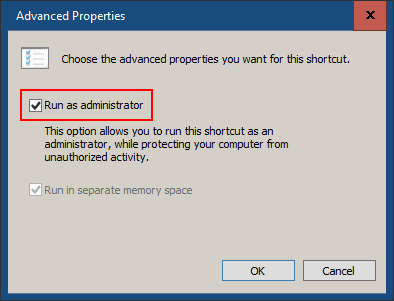
Right click the new shortcut, click Properties. Click Advanced and then check Run as administrator. Click OK twice. You may also want to create this shortcut on your other non-mobile networked devices.
-
Add entries to the web server’s hosts file
Use your dazzling new hosts file shortcut to add the following entries:
192.168.0.200 cache.cow
192.168.0.200 highland.cow
192.168.0.200 moo.cow
Save and close the hosts file. Note: changes to the host file are instant, like coffee—no need to restart anything.
-
Add entries to hosts files of non-mobile devices
Following the procedure in Section 2 above, add the same entries to the hosts file of each of the non-mobile devices.
-
Why can’t I save the hosts file?
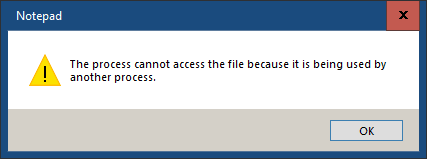
If you get the following message when you try to save your hosts file:
"The process cannot access the file because it is being used by another process."
ZoneAlarm has locked the hosts file which it does by default. Here’s how to unlock it:
- Open the ZoneAlarm client
- In the Antivirus and Firewall panel, click the View Details button
- Click Settings in the Advanced Firewall section, then click the Advanced Settings button
-
The Firewall Settings window opens to Advanced settings. Uncheck the Lock hosts file check box, click OK and close the ZoneAlarm client.
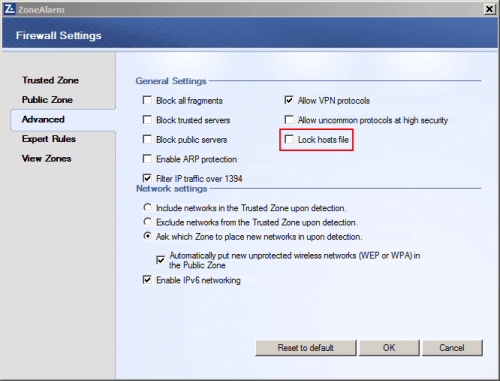
Uncheck "Lock hosts file" so you can edit the hosts file
Resource


Step 5:Configure ZoneAlarm’s Application Control Settings for Apache
-
Server Program pop-up windows
There are two variations of the Server Program pop-up:
-
The first time a request for a locally hosted webpage is made from the development server itself, ZoneAlarm will display a Server Program pop-up window stating:
Apache Server wants to accept connections from the Internet
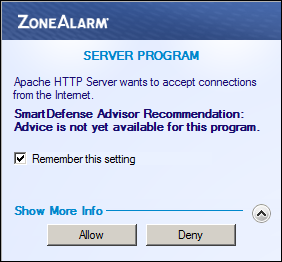
If the Remember this setting checkbox is checked (the default) and the Allow button is clicked, Zone Alarm gives Apache the following application control settings:
Smart Defense Auto Trust Level ✓ Outbound Trusted ✓ Outbound Internet ✓ Inbound Trusted ✓ Inbound Internet ✓ -
If the first time a request for a locally hosted webpage is made and it comes from a device other than the development server, ZoneAlarm displays a slightly different Server Program pop-up stating:
Apache Server wants to accept connections from the trusted zone
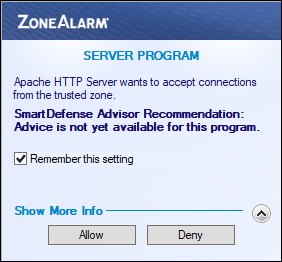
In this case if the Remember this setting checkbox is checked (the default) and the Allow button is clicked, ZoneAlarm gives Apache the following application control settings:
Smart Defense Auto Trust Level ? Outbound Trusted ✓ Outbound Internet ? Inbound Trusted ✓ Inbound Internet ? The above settings work fine for webpage requests made by devices other than development server, but these settings block webpage requests made from development server itself—Inbound and Outbound Internet connections must be allowed.
-
-
Manually configuring ZoneAlarm Server Application Control Setting
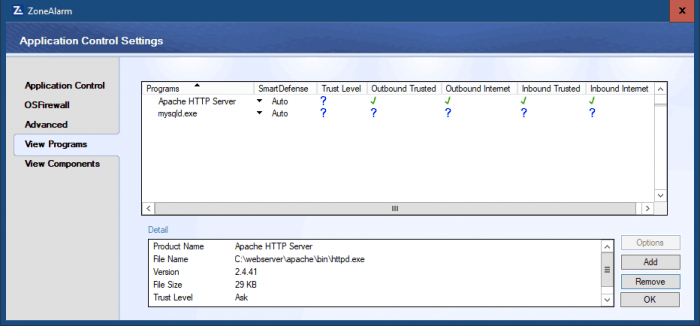
If you want to check or edit the settings yourself, find the listing for Apache HTTP Server in the View Programs section of the Application Control Settings window:
- Open the ZoneAlarm client
- Click View Details in the Antivirus and Firewall pane
- Click Settings in the Application Control section
- Click View Programs in the application control window
- Find the listing for Apache HTTP Server in the in the Application Control Settings window
-
Click the zone setting you wish to edit. Select a zone setting from the resulting pop-up. Click OK and close the ZoneAlarm client.

Here are the updated ZoneAlarm Application Control Settings for Apache HTTP Server. Apache is ready to serve webpages on the local network.
-
ZoneAlarm settings for MySQL Server
If you’ve been wondering about ZoneAlarm firewall settings for mysqld.exe, ZoneAlarm automatically assigns the following Application Control settings:
Smart Defense Auto Trust Level ❙❙❙ Outbound Trusted ✓ Outbound Internet ✓ Inbound Trusted ✓ Inbound Internet ✓ However, I’ve been using the following Application Control Settings for years with mysqld.exe without problems.
Smart Defense ? Trust Level ? Outbound Trusted ? Outbound Internet ? Inbound Trusted ? Inbound Internet ? Resources:


![]() page 3 of 4
page 3 of 4 ![]()
No comments yet…